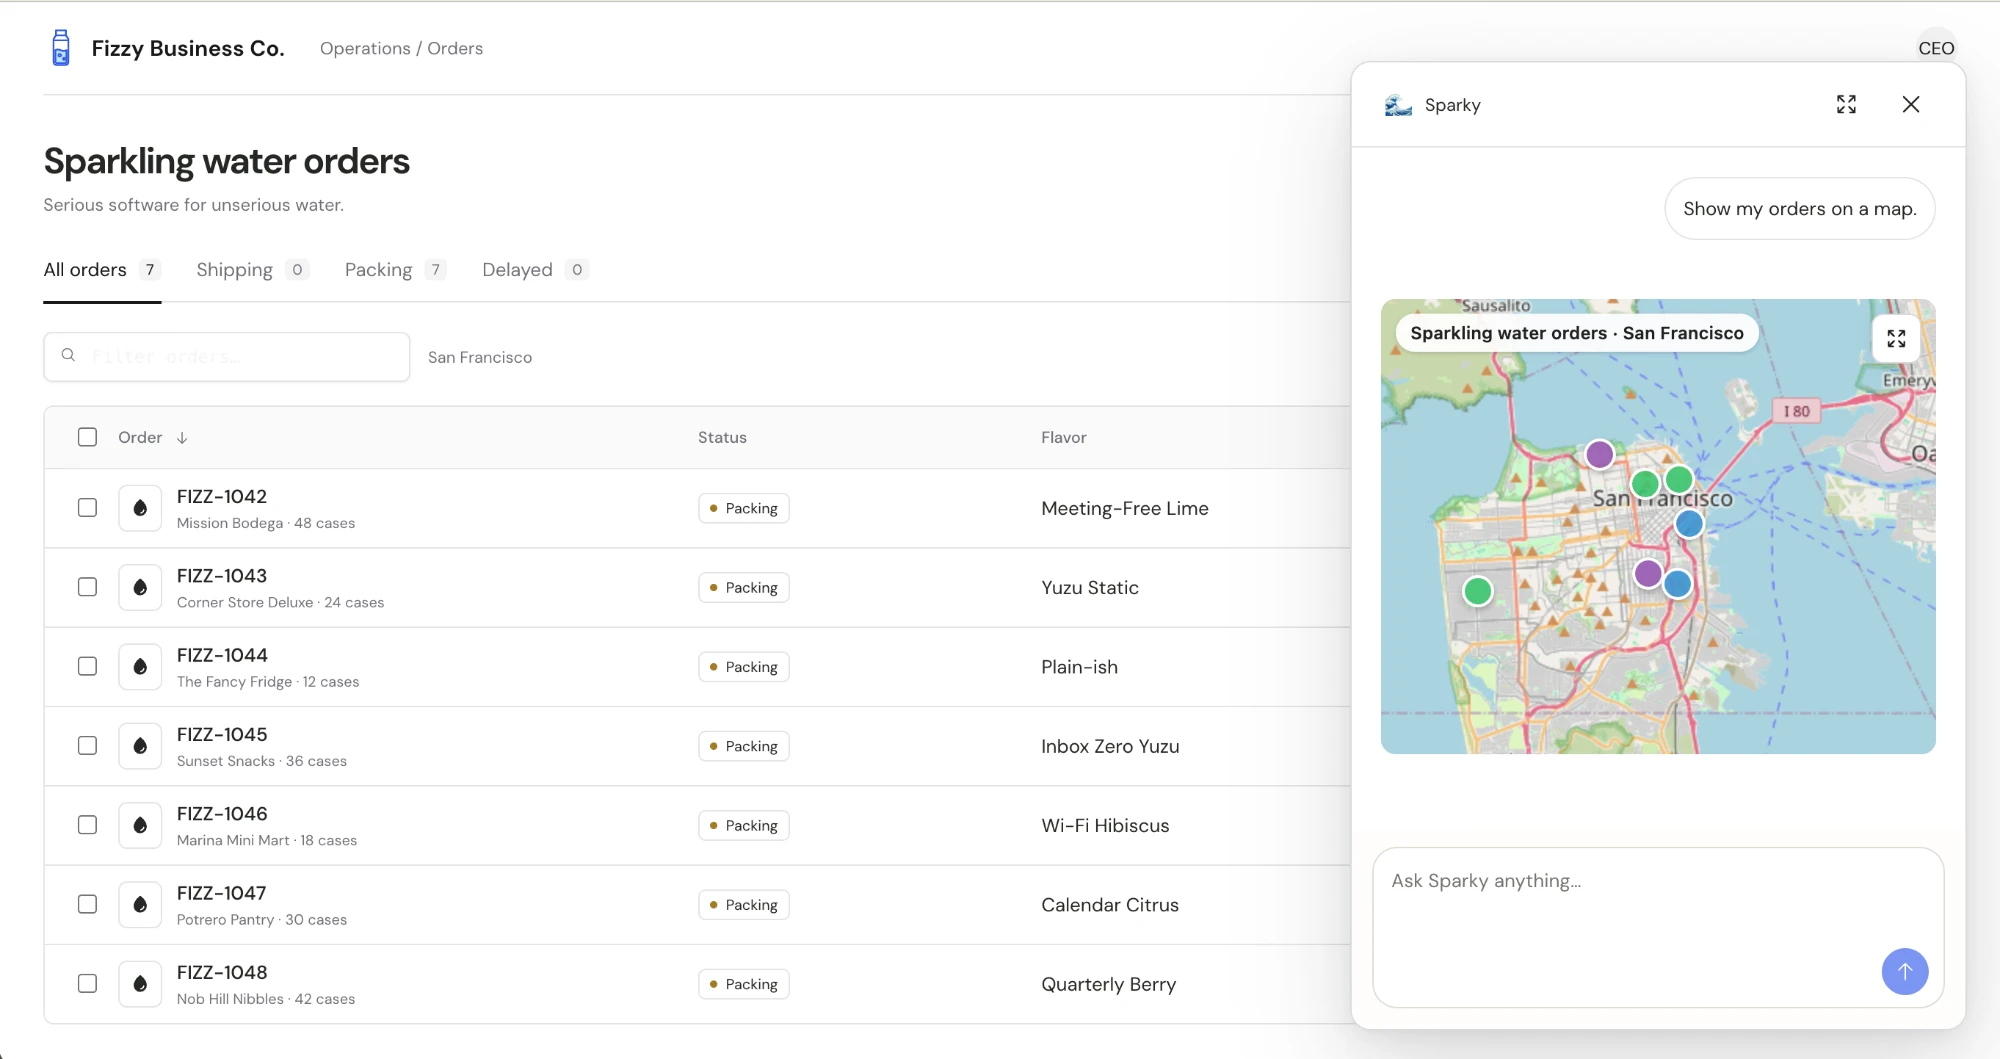
Manufact
Build an MCP App with Manufact's open-source mcp-use SDK, render it inline in CopilotKit's chat, then deploy it to Manufact Cloud.
Open your coding agent in your project's folder, or in an empty folder for a new app.This runs in a coding agent on your computer.
Manufact builds mcp-use, the open-source framework for MCP servers and MCP Apps, and Manufact Cloud, which hosts, monitors, and publishes them. An MCP App is an MCP tool that ships its own UI: when an agent calls the tool, the host renders that UI instead of returning raw JSON.
This recipe builds a small MCP App with mcp-use: a show-map tool bound to a React map view. You connect it to
CopilotKit's Built-in Agent, and the map renders inline in the chat. Your web app bundles no map library,
because the UI ships with the tool. As a bonus at the end, you host the MCP App on Manufact Cloud and point your
app at its URL.
What you'll build#
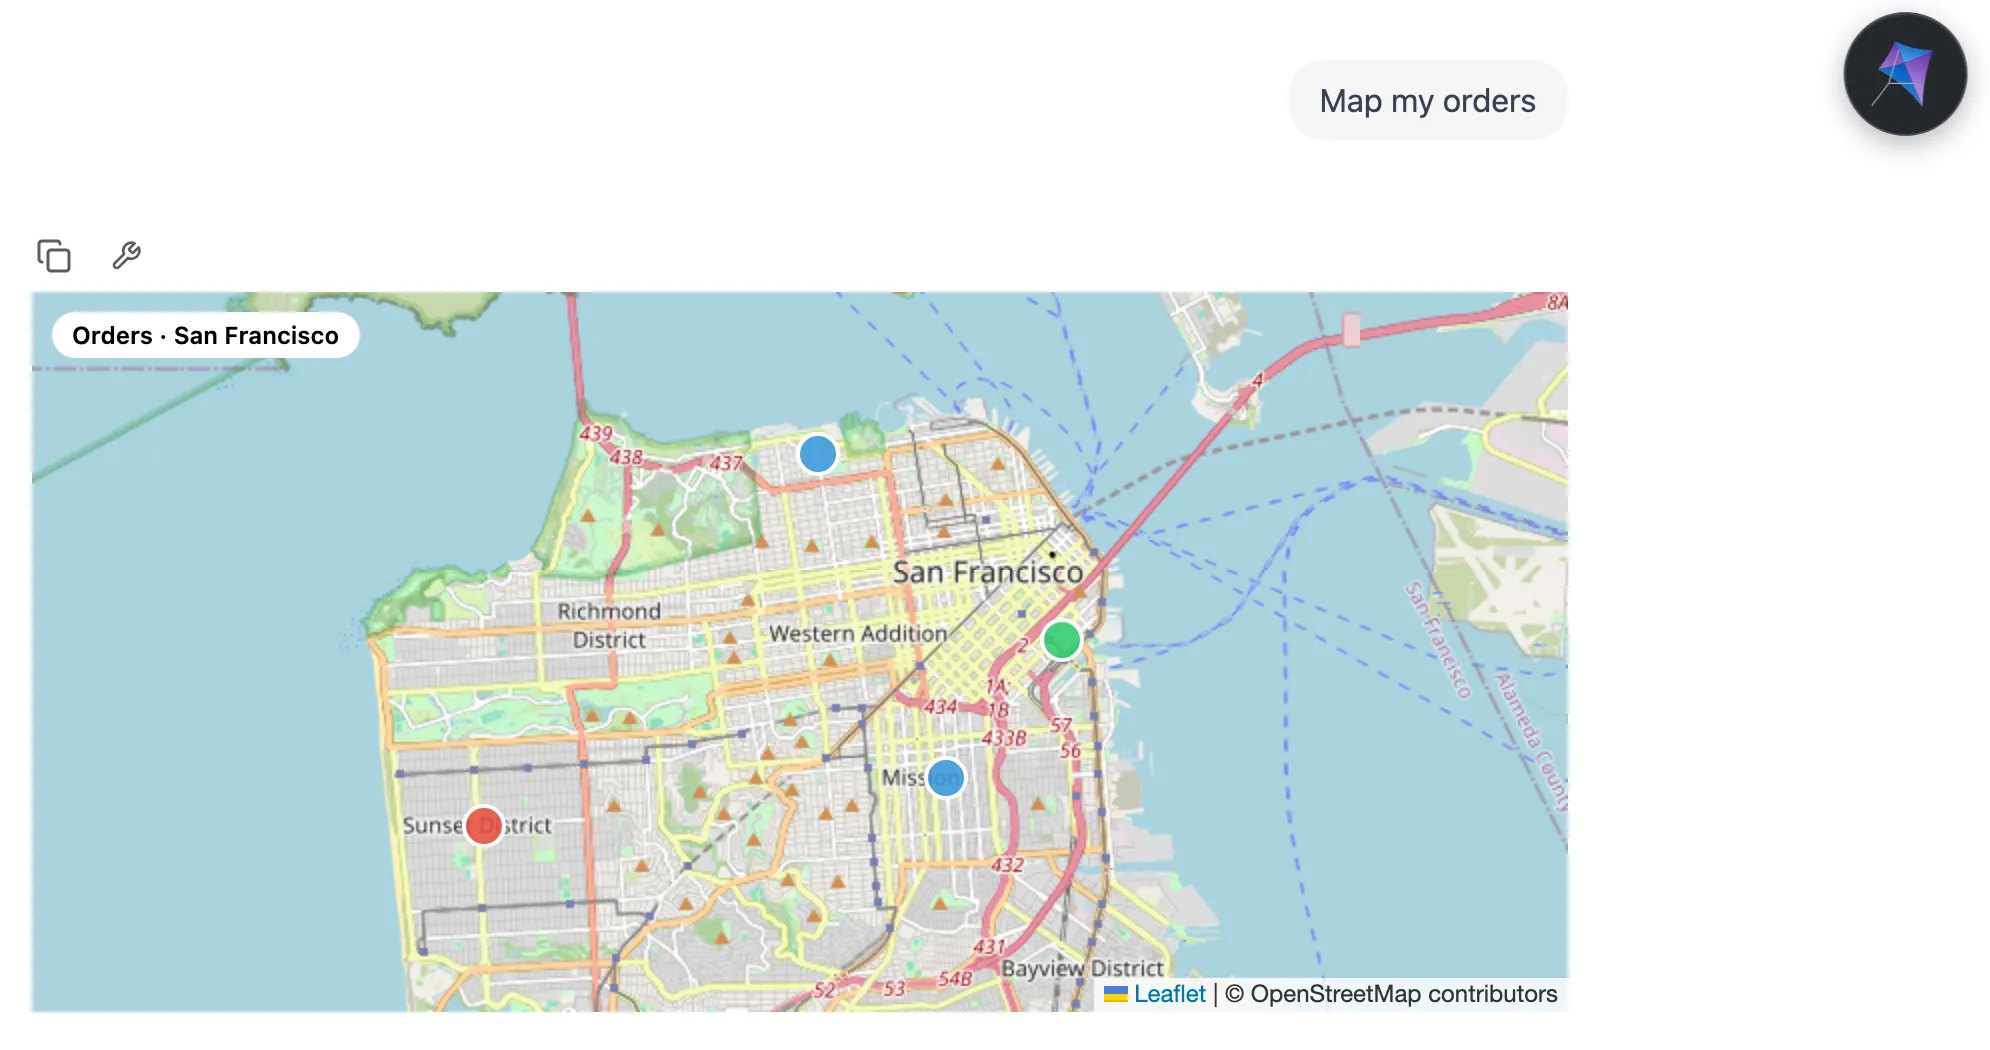
A chat you can ask to map your orders. There are three pieces:
- Fizzy Maps, a tiny MCP App built with mcp-use. It has one tool,
show-map, and a React view that draws the map. - Your web app, a Next.js app with CopilotKit. It tells CopilotKit where Fizzy Maps lives and shares your order data with the agent.
- The agent, which decides when to call
show-map. When it does, CopilotKit shows the map right in the chat.
The map code lives entirely in Fizzy Maps. Your web app never imports it.
Quick start#
Want to see it working first? The finished example lives in the CopilotKit repo. You'll need Node.js 22.22.2 or newer and an OpenAI API key.
git clone --depth 1 https://github.com/CopilotKit/CopilotKit.git
cd CopilotKit/examples/showcases/manufact-mcp-apps
npm install
cp web/.env.example web/.env  # then paste your OPENAI_API_KEY into it
npm run dev
Open http://localhost:3000 and ask it to Map my orders. The steps below build the same thing from scratch, one piece at a time.
Build it step by step#
Create your web app#
Start with a fresh Next.js app and add CopilotKit. Already have a CopilotKit app? Skip to the next step.
npx create-next-app@latest web --yes
cd web
npm install @copilotkit/react-core @copilotkit/runtime
CopilotKit's provider is a client component, so give it its own file:
"use client";

import { CopilotKitProvider } from "@copilotkit/react-core/v2";

export function Providers({ children }: { children: React.ReactNode }) {
  // Points the chat at the runtime route you'll add in a later step.
  return (
    <CopilotKitProvider runtimeUrl="/api/copilotkit">
      {children}
    </CopilotKitProvider>
  );
}
Then replace app/layout.tsx so every page is wrapped in it:
import { Providers } from "./providers";
import "@copilotkit/react-core/v2/styles.css";
import "./globals.css";

export default function RootLayout({
  children,
}: {
  children: React.ReactNode;
}) {
  return (
    <html lang="en">
      <body>
        <Providers>{children}</Providers>
      </body>
    </html>
  );
}
Scaffold the MCP App#
Open a second terminal in the folder that holds web (not inside it). Create the MCP App from mcp-use's MCP Apps
template, then add the map library:
npx create-mcp-use-app@latest fizzy-maps --template mcp-apps
cd fizzy-maps
npm install leaflet react-leaflet
npm install -D @types/leaflet
rm -rf views/my-view
The template comes with a demo view and two demo tools. You're replacing both, so the last line clears out the demo view.
Describe a map as data#
Before writing any UI, decide what a map looks like as data: a center, a zoom level, and a list of markers. This one schema does three jobs. It's what the agent sends, what the tool returns, and what the view receives.
import { z } from "zod";

// One pin on the map. The descriptions help the model fill these in correctly.
export const markerSchema = z.object({
  lat: z.number().describe("Latitude"),
  lng: z.number().describe("Longitude"),
  title: z.string().describe("Marker title"),
  description: z.string().optional().describe("Marker description"),
  color: z.enum(["red", "blue", "green", "orange", "purple"]).optional(),
});

// The whole map: where to look, how close, and what to pin.
export const mapSchema = z.object({
  title: z.string().optional().describe("Map title"),
  center: z.object({ lat: z.number(), lng: z.number() }).describe("Map center"),
  zoom: z
    .number()
    .min(1)
    .max(18)
    .describe("Zoom level (1 = world, 18 = building)"),
  markers: z
    .array(markerSchema)
    .describe("Markers to draw. Always send the complete set."),
});

export type MapState = z.infer<typeof mapSchema>;
export type Marker = z.infer<typeof markerSchema>;
Add the show-map tool#
Now replace index.ts with the tool. The view block is what turns a normal MCP tool into an MCP App. It points
at a folder under views/, and mcp-use bundles the React component in that folder and serves it with the tool.
import { MCPServer } from "mcp-use";
import { mapSchema } from "./views/map-view/schema.js";

const server = new MCPServer({
  name: "fizzy-maps",
  title: "Fizzy Maps",
  version: "1.0.0",
  description: "Deliveries on an interactive map.",
  // Guidance for the model, sent to every client that connects.
  instructions:
    "Use show-map to draw markers. Each call replaces the whole map, so always pass the complete marker set.",
});

export const showMap = server.tool(
  {
    name: "show-map",
    description: "Show an interactive map with colored, titled markers.",
    inputSchema: mapSchema,
    outputSchema: mapSchema,
    view: {
      name: "map-view", // loads views/map-view/view.tsx
      description: "Interactive Leaflet map",
      prefersBorder: false,
      csp: {
        resourceDomains: ["https://tile.openstreetmap.org"],
        connectDomains: ["https://tile.openstreetmap.org"],
      },
    },
  },
  // The tool just hands the map back. The view does the drawing.
  async (map) => ({
    content: [{ type: "text", text: `Showing ${map.markers.length} markers.` }],
    structuredContent: map,
  }),
);

export default server;
A few things worth knowing:
- The view's
namehas to match its folder name,map-view. structuredContentgoes to the view.contentis the short text summary the model reads.- The view runs in a locked-down iframe, so
csplists the one outside host it needs: OpenStreetMap's tile server, which serves the map images. Leave it out and you'll get markers on a blank gray box.
Draw the map#
The view is a regular React component. useToolContext hands it the tool's result, and
react-leaflet turns that into a map: a MapContainer, a TileLayer for the map
images, and one CircleMarker per marker.
import { useToolContext } from "mcp-use/react";
import { CircleMarker, MapContainer, TileLayer, Tooltip } from "react-leaflet";
import "leaflet/dist/leaflet.css";
import type { Marker } from "./schema.js";
import "./view.css";
// The colors the model can pick from in markerSchema, as hex values.
const COLORS: Record<NonNullable<Marker["color"]>, string> = {
red: "#e74c3c",
blue: "#3498db",
green: "#2ecc71",
orange: "#f39c12",
purple: "#9b59b6",
};
export default function MapView() {
// The show-map result arrives here, typed from the tool's outputSchema.
const view = useToolContext<"show-map">();
// The view can load before the tool finishes, so handle those states first.
if (view.status === "pending") {
return <p className="map-status">Loading map…</p>;
}
if (view.status === "error") {
return <p className="map-status">{view.error.message}</p>;
}
const { title, center, zoom, markers } = view.toolOutput;
return (
<div className="map-view">
{title && <div className="map-title">{title}</div>}
<MapContainer
center={[center.lat, center.lng]}
zoom={zoom}
zoomControl={false}
>
{/* The map images, from OpenStreetMap. The tool's csp allows this host. */}
<TileLayer
url="https://tile.openstreetmap.org/{z}/{x}/{y}.png"
attribution="© OpenStreetMap contributors"
/>
{/* One colored dot per marker, with its title on hover. */}
{markers.map((marker) => (
<CircleMarker
key={`${marker.lat},${marker.lng}`}
center={[marker.lat, marker.lng]}
radius={10}
pathOptions={{
color: "#fff",
weight: 2,
fillColor: COLORS[marker.color ?? "blue"],
fillOpacity: 0.85,
}}
>
<Tooltip>
{marker.title}
{marker.description && ` · ${marker.description}`}
</Tooltip>
</CircleMarker>
))}
</MapContainer>
</div>
);
}And a little CSS so the map fills its frame:
html,
body,
#root {
  height: 100%;
  margin: 0;
}
.map-view {
  position: relative;
  height: 100%;
  min-height: 360px;
}
.map-view .leaflet-container {
  height: 100%;
}
.map-title {
  position: absolute;
  top: 10px;
  left: 10px;
  z-index: 1000;
  padding: 4px 10px;
  border-radius: 999px;
  background: #fff;
  font:
    600 12px system-ui,
    sans-serif;
}
.map-status {
  padding: 16px;
  font:
    14px system-ui,
    sans-serif;
}
Try it in the mcp-use Inspector#
Start the MCP App. Your web app will use port 3000, so put this one on 3001:
npm run dev -- --port 3001This also opens the mcp-use Inspector at
http://localhost:3001/mcp/inspector. It's Manufact's tool for trying an MCP
server by hand, with no agent involved. Go to Tools, pick show-map, and fill in its fields with these values
(the Inspector gives each key its own field). Then click Execute:
{
  "title": "Test map",
  "center": { "lat": 37.777, "lng": -122.42 },
  "zoom": 12,
  "markers": [
    {
      "lat": 37.7599,
      "lng": -122.4148,
      "title": "Mission Bodega",
      "color": "purple"
    }
  ]
}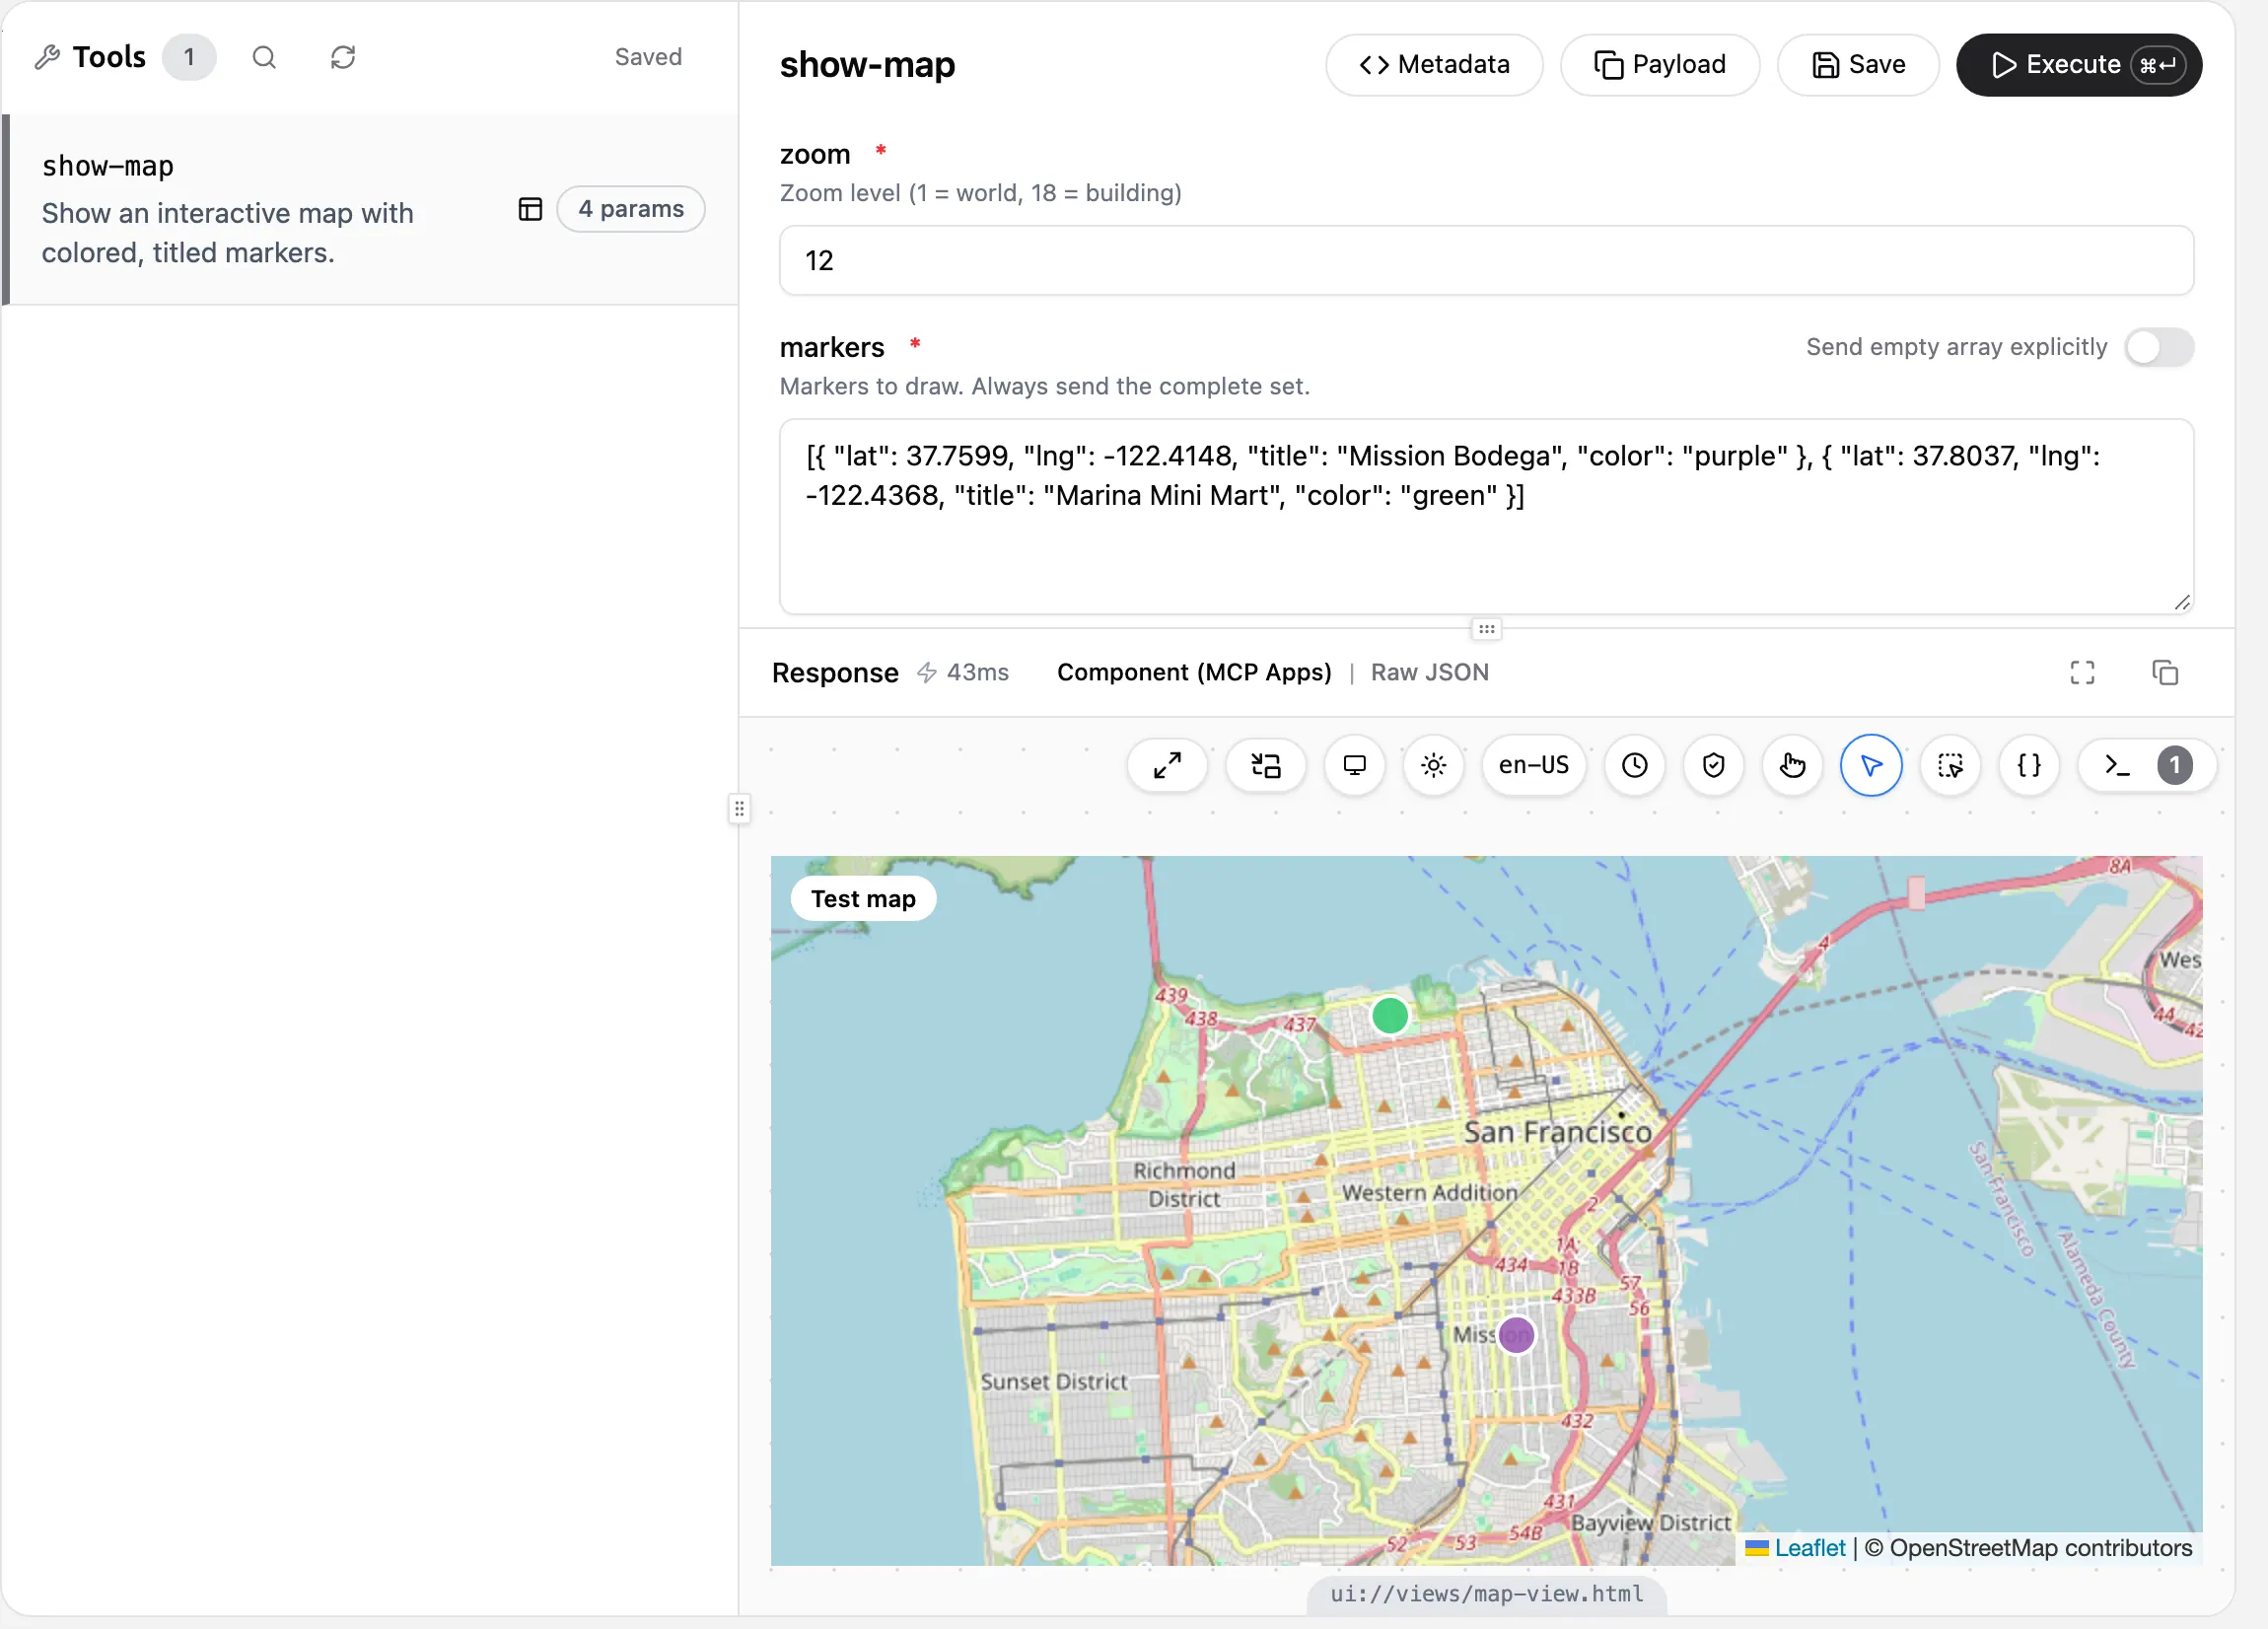
If the map shows up here, the MCP App is done. Everything from here on happens in your web app.
Connect it to CopilotKit#
Back in web, create a .env file with your OpenAI key and the MCP App's address:
OPENAI_API_KEY=sk-your_key
MAP_MCP_URL=http://localhost:3001/mcp
Then create the runtime route. The highlighted mcpApps block is the whole integration. It tells CopilotKit where
Fizzy Maps lives. CopilotKit picks up its tools, gives them to the agent, and renders the map whenever show-map
runs.
import {
  BuiltInAgent,
  CopilotRuntime,
  createCopilotRuntimeHandler,
} from "@copilotkit/runtime/v2";

const agent = new BuiltInAgent({
  model: "openai/gpt-5.5",
  // When to reach for the map, and a reminder to stick to real data.
  prompt:
    "You are an operations copilot. To map orders, call show-map with the map arguments from context. " +
    "Each call replaces the map, so always pass the complete marker set. Never invent locations.",
});

const runtime = new CopilotRuntime({
  agents: { default: agent },
  mcpApps: {
    servers: [
      {
        type: "http",
        url: process.env.MAP_MCP_URL ?? "http://localhost:3001/mcp",
        // Any name you like. Keep it the same when the URL changes.
        serverId: "fizzy-maps",
      },
    ],
  },
});

const handler = createCopilotRuntimeHandler({
  runtime,
  basePath: "/api/copilotkit",
});

export const GET = handler;
export const POST = handler;
export const PATCH = handler;
export const DELETE = handler;
The serverId is how saved conversations find their MCP App later. If you keep it the same when you deploy, maps
in older threads still load from the new URL.
Share your orders and add the chat#
The agent needs real data to put on the map. This file holds a few sample orders and builds the exact arguments
show-map expects:
const COLORS = { Packing: "blue", Shipping: "green", Delayed: "red" } as const;

type Order = {
  id: string;
  name: string;
  status: keyof typeof COLORS;
  lat: number;
  lng: number;
};

export const orders: Order[] = [
  {
    id: "FIZZ-1042",
    name: "Mission Bodega",
    status: "Packing",
    lat: 37.7599,
    lng: -122.4148,
  },
  {
    id: "FIZZ-1043",
    name: "Corner Store Deluxe",
    status: "Shipping",
    lat: 37.7785,
    lng: -122.395,
  },
  {
    id: "FIZZ-1045",
    name: "Sunset Snacks",
    status: "Delayed",
    lat: 37.7534,
    lng: -122.494,
  },
  {
    id: "FIZZ-1046",
    name: "Marina Mini Mart",
    status: "Packing",
    lat: 37.8037,
    lng: -122.4368,
  },
];

// The complete show-map arguments, so the model never has to guess coordinates.
export const orderMap = {
  title: "Orders · San Francisco",
  center: { lat: 37.777, lng: -122.44 },
  zoom: 12,
  markers: orders.map((order) => ({
    lat: order.lat,
    lng: order.lng,
    title: `${order.id} · ${order.name}`,
    description: order.status,
    color: COLORS[order.status],
  })),
};
Then replace app/page.tsx. It hands that data to the agent with useAgentContext and shows a chat:
"use client";

import { CopilotChat, useAgentContext } from "@copilotkit/react-core/v2";
import { orderMap, orders } from "@/lib/orders";

export default function Page() {
  // Everything the agent needs to call show-map, straight from your app.
  useAgentContext({
    description:
      "Current delivery orders, plus the complete arguments for show-map.",
    value: { orders, map: orderMap },
  });

  return (
    <main
      style={{
        height: "100dvh",
        width: "100%",
        maxWidth: 860,
        margin: "0 auto",
      }}
    >
      <CopilotChat />
    </main>
  );
}
Notice what's missing: there's no map code here and no custom renderer. CopilotKit draws MCP Apps on its own.
Try it#
Leave the MCP App running in its terminal. In the web terminal, run npm run dev, open
http://localhost:3000, and ask:
Map my ordersThe agent calls show-map with your orders, and the map appears right in the chat:
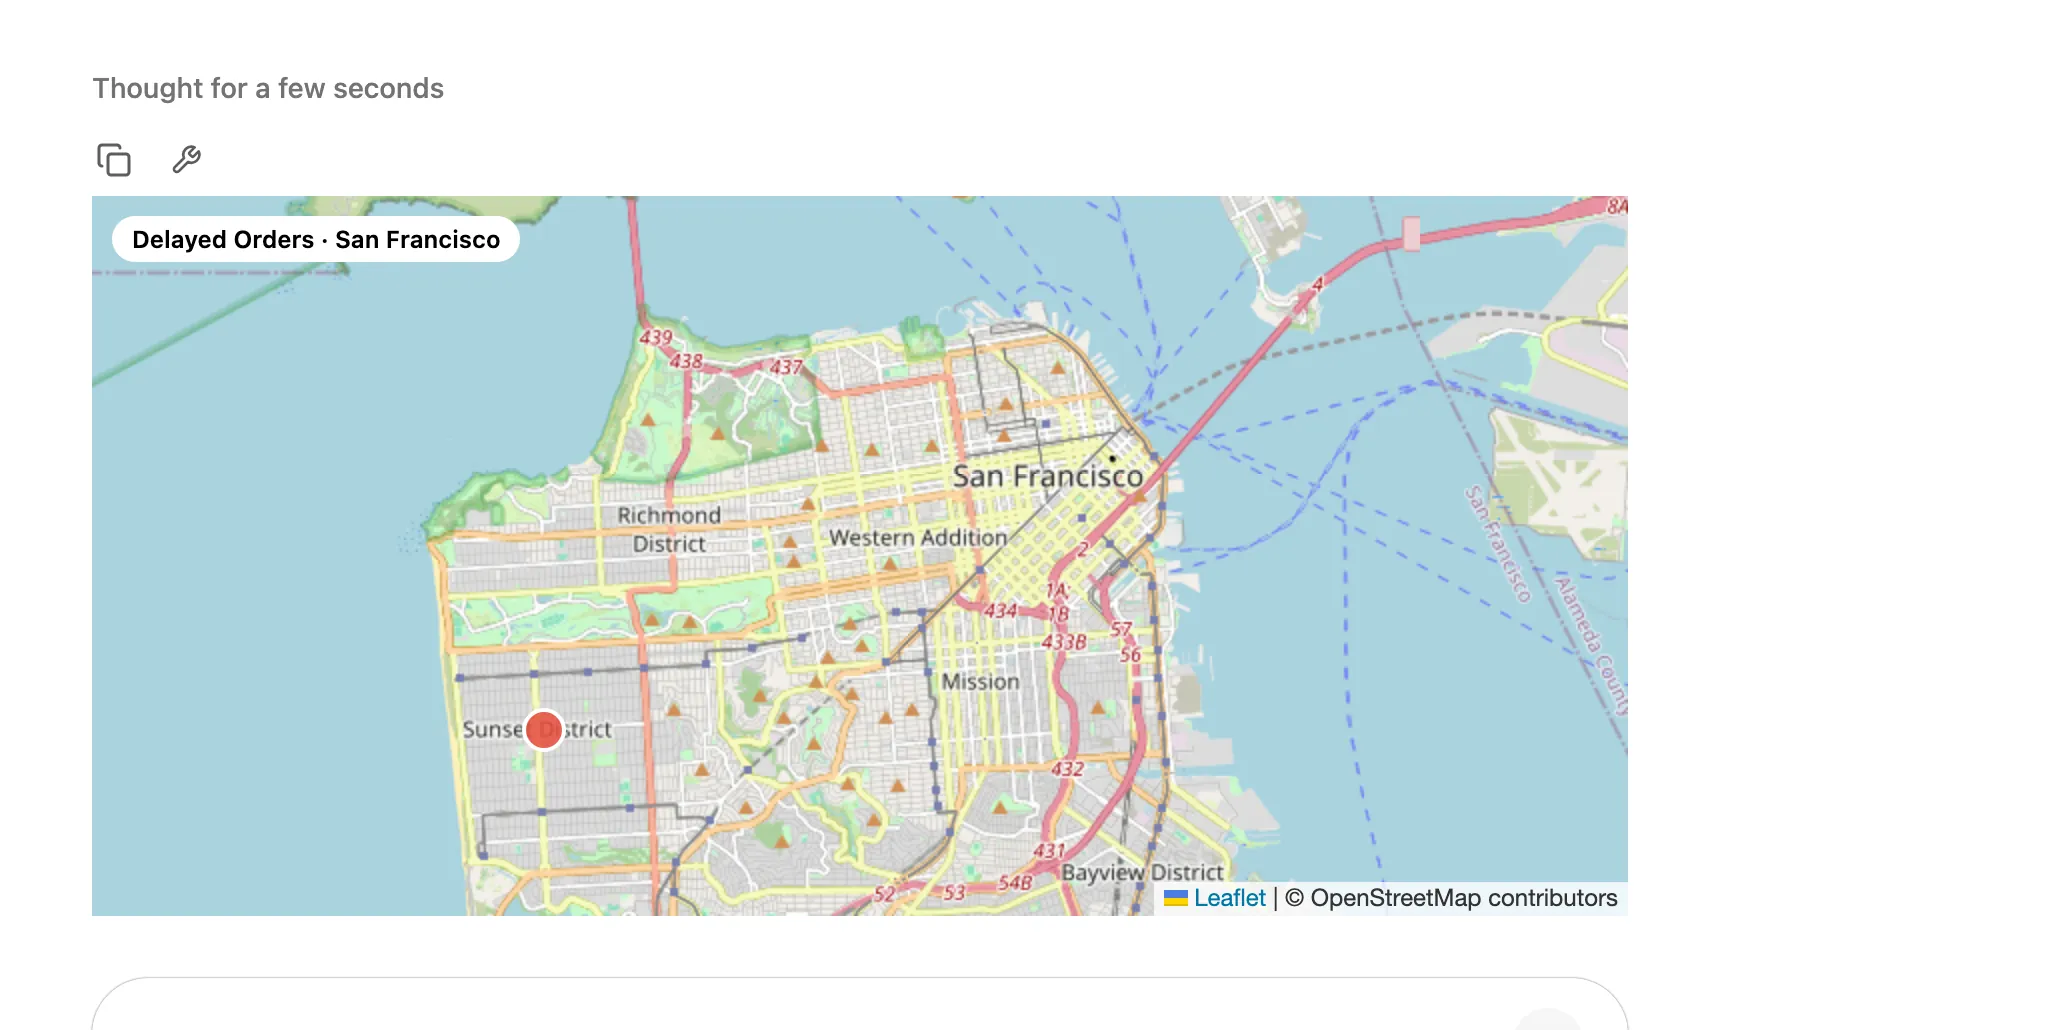
Now narrow it down:
Only show the delayed onesThe agent calls show-map again with just the delayed order, and a fresh map shows up:
Look under the hood with the CopilotKit Inspector#
See the kite button in the corner of your app? That's the CopilotKit Inspector. It shows up in development and watches the conversation between your app and the agent. It's a different tool from the mcp-use Inspector: that one talks to your MCP App directly, and this one shows what happened in your chat.
Open it and go to AG-UI Events. You'll see the whole map request play out. The agent streams its show-map
call (TOOL_CALL_ARGS, then TOOL_CALL_END), the result comes back (TOOL_CALL_RESULT), and an
ACTIVITY_SNAPSHOT carries the MCP App that CopilotKit draws in the chat.
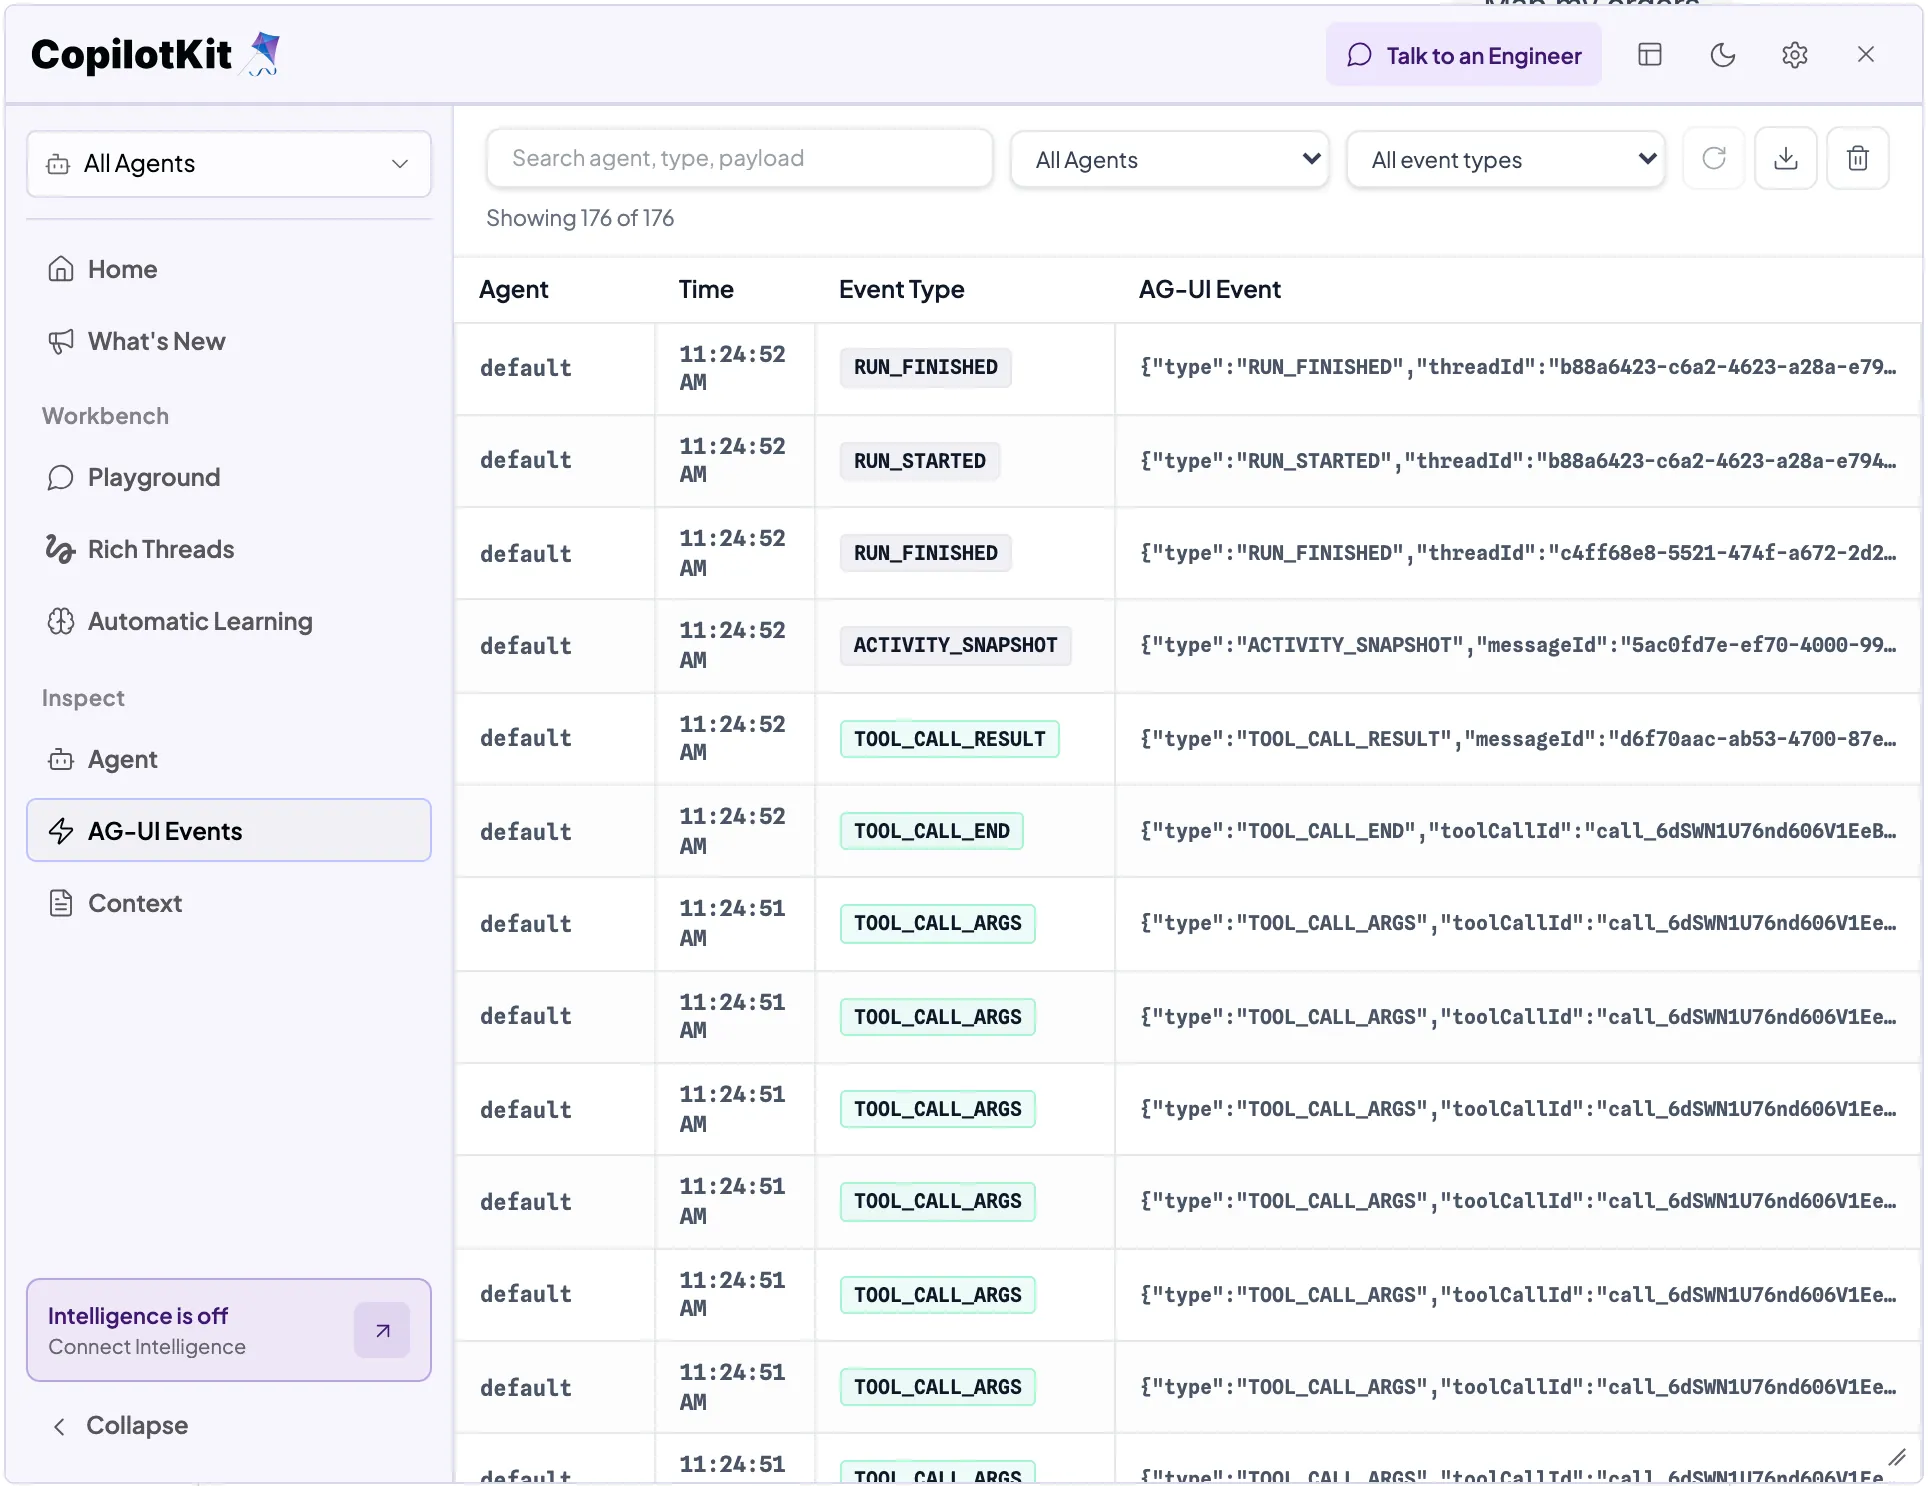
If a map ever fails to show up, start here. You'll see whether the agent called show-map at all, and what came
back.
Bonus: host the MCP App on Manufact Cloud#
So far Fizzy Maps runs on your laptop. Manufact Cloud can host it, which gives it a real URL that your deployed web
app can reach. So can ChatGPT, Claude, or any other MCP client. From the fizzy-maps folder:
npx mcp-use login
npx mcp-use deploy
By default, deploy ships from your GitHub repo and walks you through connecting Manufact's GitHub App. No repo?
Add --no-github to upload the folder as it is. If the app lives in a monorepo, point at it with --root-dir.
When the deploy finishes, the CLI prints your server's URL. Put it in web/.env and restart the web app:
MAP_MCP_URL=https://<your-slug>.run.mcp-use.com/mcpThat's the only change. Running mcp-use deploy again later redeploys the same server.
One thing before you share that URL widely: anyone who has it can call your tools. That's fine for a read-only map
of sample data. If your MCP App touches real user data, add
authentication in mcp-use and pass the
credential from your runtime with headers on the server entry. The browser never talks to the MCP App directly,
so the credential stays on your server. Your /api/copilotkit route deserves the same care, since every message
spends model credits. See authentication.
Where to go next#
- Make the map interactive. Inside a view,
useCallTool()frommcp-use/reactcalls other tools on the same server, anduseSendFollowUp()sends a message back into the chat. CopilotKit passes both through for you. - Ship it to ChatGPT and Claude. The same MCP App works in any MCP Apps host. Manufact's publish checks and submission pack get it ready for their app directories.
- Watch real traffic. Manufact Cloud shows tool calls, sessions, and logs for your deployed server. See Usage & traffic.
- Read more. The mcp-use MCP Apps docs cover views in depth, and MCP Apps covers CopilotKit's side.
Get the code#
The finished example is in the CopilotKit repo at
examples/showcases/manufact-mcp-apps.
For the fuller Fizzy Business demo, with an order desk, a copilot, and a Playwright test suite, see
CopilotKit/mcp-apps-demo-night-talk.