Threads Drawer
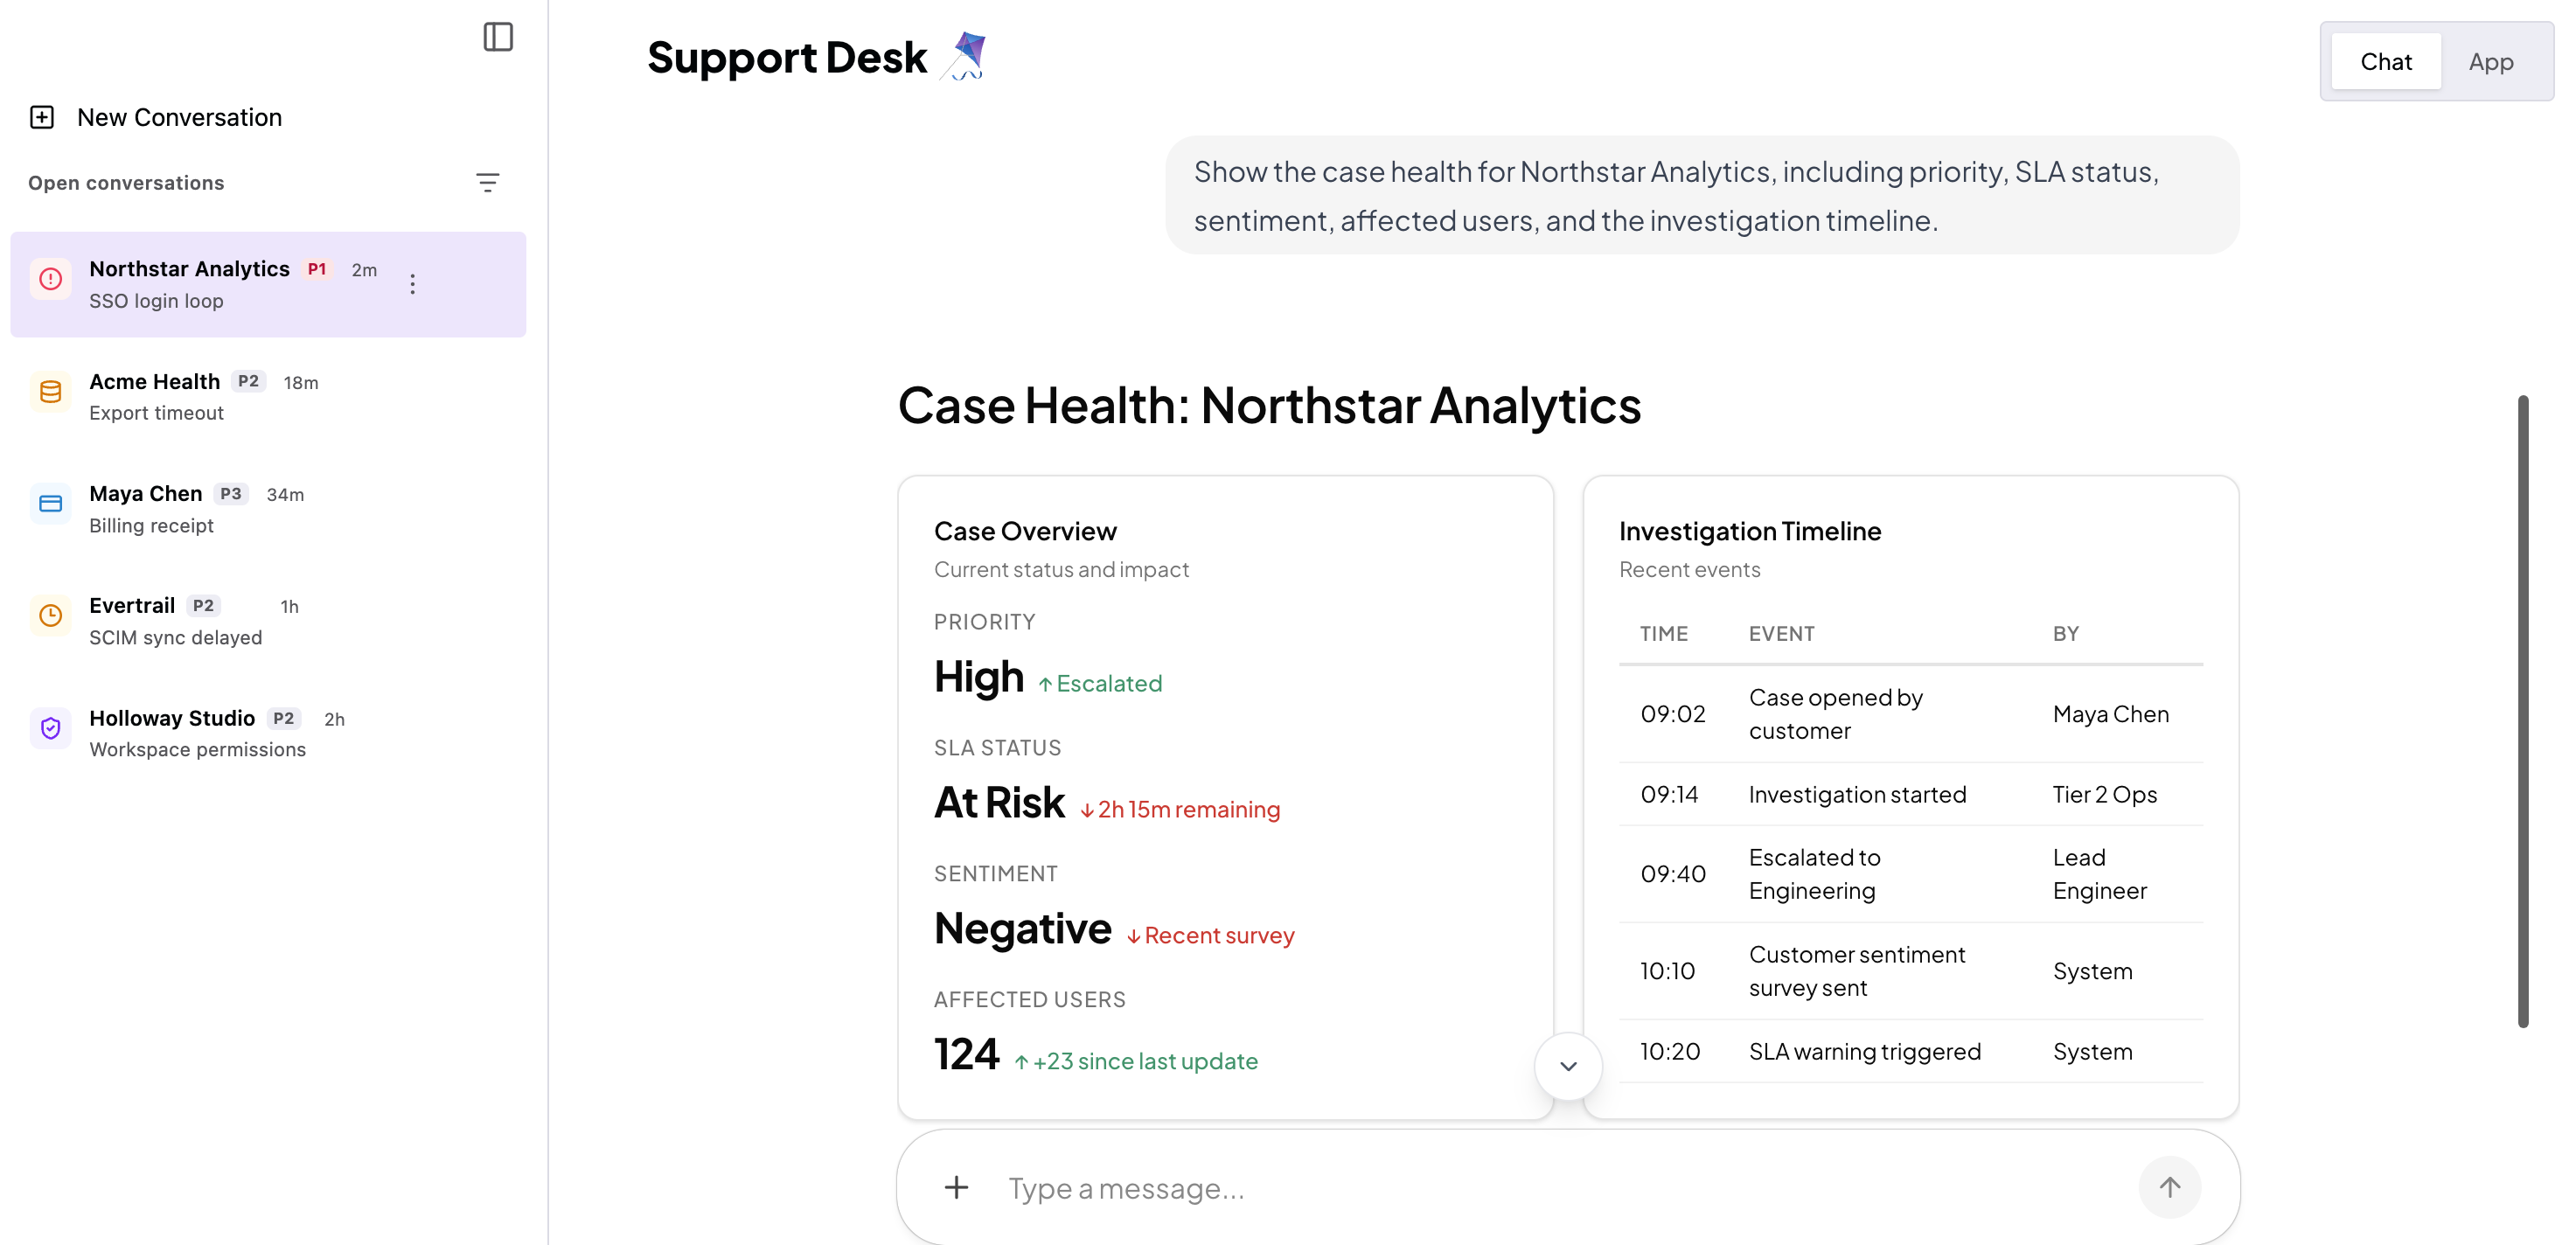
Drop-in threads drawer that lists, switches, and manages conversations next to your chat.
What is this?
<CopilotThreadsDrawer> gives your app a ready-made conversation sidebar. Users can
list, switch, start, archive, and delete their threads, and you wire up
no active-thread state to make it work. Drop it next to your chat and it
connects automatically.
If your project was created from a CopilotKit CLI starter, the Drawer and its shared chat configuration are already included. Otherwise, use the setup below to add it to an existing CopilotKit application. This guide also covers Drawer customization and component options.
Internally, it's a thin React wrapper around the self-contained
copilotkit-threads-drawer web component, fed by useThreads
and your chat configuration.
Prefer to build your own thread UI? The same data and actions are available
headlessly through the useThreads hook (see
Headless Threads). Thread rename is one of those headless
actions: the prebuilt drawer's row menu covers archive/unarchive and delete, so
wire up rename with useThreads and your own UI if you need it.
When should I use this?
Use the drawer when you want:
- A persistent thread switcher beside your chat (chat-history sidebar)
- Thread switching, new conversations, archive, and delete with zero wiring
- A self-contained, themeable UI that follows your app's light/dark theme
- A mobile-ready off-canvas drawer with its own launcher
It requires CopilotKit Intelligence (threads are stored and synced server-side). Start cloud-hosted setup to create or select a project.
For multi-user applications, configure the Runtime to scope threads to the signed-in user.
Threads run in CopilotKit IntelligenceConnect a cloud-hosted project to get persistent threads and realtime sync.Get CopilotKit Intelligence freeSet up the Threads Drawer
Place <CopilotThreadsDrawer> next to <CopilotChat> and wrap both in a
shared <CopilotChatConfigurationProvider>. If you are using a CLI-created
starter, this structure is already in place. The shared configuration lets
the Drawer control the chat. Select a row, and the chat loads that thread and
its history. Select "New Conversation", and the chat shows the welcome screen.
The following example shows the essential structure to add to an existing app
or preserve while customizing a starter.
import {
  CopilotKitProvider,
  CopilotChatConfigurationProvider,
  CopilotChat,
  CopilotThreadsDrawer,
} from "@copilotkit/react-core/v2";
import "@copilotkit/react-core/v2/styles.css";

export default function Page() {
  return (
    <CopilotKitProvider runtimeUrl="/api/copilotkit">
      <CopilotChatConfigurationProvider>
        <div style={{ display: "flex", height: "100dvh" }}>
          <CopilotThreadsDrawer />
          <CopilotChat />
        </div>
      </CopilotChatConfigurationProvider>
    </CopilotKitProvider>
  );
}
Import the Drawer, the chat, and the provider from @copilotkit/react-core/v2.
Start your app and send a message. After the run, the thread appears in the Drawer. Select "New Conversation", then select the first thread. The chat shows its history again.
Use the Drawer with a sidebar chat
<CopilotChat> is not the only host. <CopilotSidebar> works the same way,
because it renders a <CopilotChat> inside itself and therefore shares the same
chat configuration. Keep the Drawer as a sibling of your content and put the
sidebar alongside it:
import {
  CopilotKitProvider,
  CopilotChatConfigurationProvider,
  CopilotSidebar,
  CopilotThreadsDrawer,
} from "@copilotkit/react-core/v2";
import "@copilotkit/react-core/v2/styles.css";

export default function Page() {
  return (
    <CopilotKitProvider runtimeUrl="/api/copilotkit">
      <CopilotChatConfigurationProvider>
        <div style={{ display: "flex", height: "100dvh" }}>
          <CopilotThreadsDrawer />
          <main style={{ flex: 1 }}>
            <YourMainContent />
            <CopilotSidebar defaultOpen={true} />
          </main>
        </div>
      </CopilotChatConfigurationProvider>
    </CopilotKitProvider>
  );
}
<CopilotPopup> hosts the Drawer on the same terms, for the same reason.
The launcher button that opens the Drawer from the chat header appears on mobile viewports only. On desktop the Drawer is an in-flow panel. Its own collapse toggle hides it, and its floating launcher opens it again, so the chat header shows no launcher there.
Add your own "New conversation" button
The Drawer has its own "New Conversation" row. Your app can also keep its own
button, for example in a toolbar or a page header. To start a new conversation
from that button, call startNewThread() from
useCopilotChatConfiguration.
This is the same function the Drawer calls for its own row.
import {
  CopilotKitProvider,
  CopilotChatConfigurationProvider,
  CopilotChat,
  CopilotThreadsDrawer,
  useCopilotChatConfiguration,
} from "@copilotkit/react-core/v2";
import "@copilotkit/react-core/v2/styles.css";

function NewConversationButton() {
  const configuration = useCopilotChatConfiguration();

  return (
    <button
      type="button"
      onClick={() => configuration?.startNewThread()}
    >
      New conversation
    </button>
  );
}

export default function Page() {
  return (
    <CopilotKitProvider runtimeUrl="/api/copilotkit">
      <CopilotChatConfigurationProvider>
        <div style={{ display: "flex", height: "100dvh" }}>
          <CopilotThreadsDrawer />
          <main style={{ flex: 1, display: "flex", flexDirection: "column" }}>
            <header>
              <NewConversationButton />
            </header>
            <CopilotChat />
          </main>
        </div>
      </CopilotChatConfigurationProvider>
    </CopilotKitProvider>
  );
}
How it works:
-
Put the button inside the same
<CopilotChatConfigurationProvider>as the Drawer and the chat. Outside a provider,useCopilotChatConfiguration()returnsnulland the button does nothing. -
startNewThread()gives the chat a new thread id and shows the welcome screen. The Drawer reads the active thread from the same configuration, so no row stays selected. -
The new thread appears in the Drawer list after its first run. An empty thread does not get a row.
-
If you set the
threadIdprop on<CopilotChatConfigurationProvider>, your app controls the thread. ThenstartNewThread()and the Drawer's own row selection do nothing and log a warning. To control the thread:- Keep the thread id in your own state.
- Pass it as
threadIdto<CopilotChatConfigurationProvider>. - Pass
onThreadSelectandonNewThreadto the Drawer. - Call the same function as
onNewThreadfrom your button.
function ControlledChat() {
  const [threadId, setThreadId] = useState(() => crypto.randomUUID());
  const startNew = () => setThreadId(crypto.randomUUID());

  return (
    <CopilotChatConfigurationProvider threadId={threadId}>
      <CopilotThreadsDrawer
        onThreadSelect={(id) => setThreadId(id)}
        onNewThread={startNew}
      />
      <button type="button" onClick={startNew}>
        New conversation
      </button>
      <CopilotChat />
    </CopilotChatConfigurationProvider>
  );
}
To show only your button, hide the Drawer's own new-conversation controls with
their CSS parts. new-thread-button is the row in the open Drawer.
launcher-new-thread is the (+) button in the closed or collapsed launcher.
copilotkit-threads-drawer::part(new-thread-button),
copilotkit-threads-drawer::part(launcher-new-thread) {
  display: none;
}
Which agent's threads the drawer shows
The drawer lists the threads of one agent. It takes the first agent ID it finds, in this order:
- The drawer's own
agentIdprop. - The
agentIdof the nearest<CopilotChatConfigurationProvider>.<CopilotKit>renders one of these around your app with itsagentprop, so under<CopilotKit agent="...">the drawer stops here. Withoutagent, it resolves to"default". - The
agentIdon<CopilotKitProvider>. "default".
Most framework quickstarts use <CopilotKit agent="...">. The built-in agent
and LangGraph quickstarts use <CopilotKitProvider agentId="...">. The drawer
finds the agent under either one.
If your runtime registers several agents, the drawer shows only the threads of the agent it resolved. To list another agent's threads, pass that agent's ID:
<CopilotThreadsDrawer agentId="research_agent" /><CopilotChat> resolves its agent in the same order. To move the drawer and
the chat to another agent together, set agentId once on the shared
<CopilotChatConfigurationProvider> instead.
Configuring the drawer
<CopilotThreadsDrawer> works with zero props. The optional ones:
| Prop | Description |
|---|---|
agentId | Agent whose threads to list. Defaults to the chat configuration's agent, then agentId on <CopilotKitProvider>, then "default". See Which agent's threads the drawer shows. |
label | Accessible name for the drawer region and thread listbox. Defaults to "Threads". The header shows no title. |
recentLabel | Section heading shown above the thread list. Defaults to "Recent Conversations". |
onThreadSelect | Escape hatch to take over thread selection yourself. |
onNewThread | Escape hatch to handle the "New Conversation" row yourself. |
renderRow | Render custom content per row (keeps the row chrome around it). |
limit | Page size for pagination. Shows a "Load more" control while more threads remain. Omit to load all at once. |
See the Threads Drawer reference for the full prop and type list.
Customization
The drawer renders in a shadow root with self-contained, theme-inheriting styles, so it looks correct in any app (including dark mode) with no config. Three bounded escape hatches pierce the boundary:
-
Slots: project children with a
slotattribute (header,empty,footer,memories,launcher-icon):<CopilotThreadsDrawer> <span slot="header">My conversations</span> </CopilotThreadsDrawer> -
Per-row content: the
renderRowprop projects custom content into each row while the element keeps selection, archived styling, and the per-row kebab menu (Archive/Delete). -
CSS parts + variable tokens: restyle structural
::part()s or override--cpk-drawer-*tokens. The full list is in the reference.
Intelligence access
Threads require CopilotKit Intelligence. The drawer resolves its entitlement through the Runtime, so the credential is server-side configuration rather than a prop on the provider. Which credential you set depends on how you deploy.
Cloud-hosted Intelligence. The project-scoped CPK_INTELLIGENCE_API_KEY is the
credential, and the Runtime resolves the drawer's entitlement from your
organization's subscription. Cloud-hosted setup does not issue
COPILOTKIT_LICENSE_TOKEN. That token is only for offline or self-hosted
licensing and does not replace the cloud-hosted project API key. If the CLI created
your project, the key is already in .env and the drawer needs nothing further.
Self-hosted and open source. Give the Runtime a license token, either as the
licenseToken option or as the COPILOTKIT_LICENSE_TOKEN environment variable.
The option wins when you set both. Without a token the drawer shows a locked
view with an Upgrade link in place of the list, and it issues no thread
requests.
The locked view appears whenever the Runtime reports no active entitlement: a self-hosted deployment whose license token is missing or expired, or a cloud-hosted project whose subscription is inactive.
To compare thread UIs and deployment paths, see the threads overview.
How is this guide?